[ad_1]
Step-by-step guide to creating a Google Business Email account with your own domain Creating a professional email account using your own domain can provide a multitude of benefits for your business or organization. It not only adds a touch of credibility but also enhances your brand identity. In this step-by-step guide, we will explore the process of creating a Google Business Email account with your very own domain.
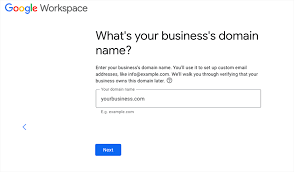
Step 1: Choosing a Domain
The first step is to select a domain for your business email. A domain is the web address that represents your organization. Ensure that the domain name you choose is unique, simple, and easy to remember. You can purchase a domain from various domain registrars such as GoDaddy, Namecheap, or Google Domains.
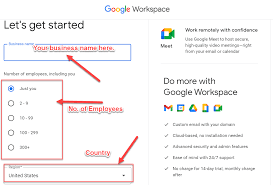
Step 2: Sign up for Google Workspace
Google Workspace, previously known as G Suite, is a collection of productivity and collaboration tools offered by Google. Visit the Google Workspace website and sign up for an account. There are different plans available, so choose the one that best suits your requirements.
Step 3: Verification and Setup
Once you have signed up for Google Workspace, you will be redirected to the admin panel. Here, you need to verify that you own the domain you intend to associate with your email account. Google offers several verification methods, including adding a DNS record, uploading an HTML file to your website hosting server, or adding a meta tag to your homepage. Choose the method that is most convenient for you and follow the instructions provided by Google.
Step 4: Adding Users
After verifying your domain, you can start adding users to your Google Workspace account. Users can be your employees, colleagues, or anyone who requires a professional email address associated with your domain. You can create and manage user accounts directly from the admin panel. Assign each user a unique email address and choose their respective roles and permissions.
Step 5: Customizing Email Addresses and Aliases
Google Workspace allows you to customize email addresses and create aliases. For example, if your domain is “example.com,” you can create an email address like “yourname@example.com.” However, you can also create aliases such as “info@example.com,” which will forward mail to a designated user. Customizing email addresses and aliases is beneficial for organizing communication and ensuring messages reach the right recipients.
Step 6: Setting up MX Records
To ensure that your emails are delivered correctly, you need to set up MX records (Mail Exchanger records) on your domain’s DNS settings. MX records specify which servers handle the email delivery for your domain. Google provides detailed instructions on how to configure MX records based on your DNS provider. Follow these instructions carefully to avoid any issues with the delivery of your emails.
Step 7: Email Migration (Optional)
If you already have existing email accounts on another platform, you can migrate your email data to your new Google Workspace account. Google provides migration tools for popular platforms like Microsoft Exchange, Outlook, and other IMAP-enabled email providers. The migration process varies depending on the platform you are migrating from. Plan and execute the migration carefully, ensuring all your important emails and data are safely transferred.
Step 8: Security and Additional Features
Google Workspace offers advanced security features to protect your business email account from threats like spam, malware, and phishing attacks. Take advantage of these features to safeguard your organization’s communication. Additionally, explore other features such as shared calendars, document collaboration, video conferencing, and cloud storage, which can enhance productivity and collaboration within your team.
Step 9: Training and Support
Once your Google Business Email account is set up, familiarize yourself with the various features and functionalities provided by Google Workspace. Explore the Help Center and Google Workspace Learning Center for tutorials, best practices, and troubleshooting guides. Regularly update yourself and your team on the latest features and security measures to optimize your email usage.
Unveiling Google Ads’ New Account: The Game-Changer for Advertisers
In conclusion, creating a Google Business Email account with your own domain is a valuable step towards establishing a professional online presence. By following this step-by-step guide and utilizing the extensive features offered by Google Workspace, you can streamline your communication, enhance your brand, and take advantage of Google’s secure and reliable email infrastructure.
[ad_2]