
[ad_1]
The Ultimate Guide on How to Register Your Business Email with Google
In today’s digital age, having a professional email address for your business is essential. It not only helps establish credibility but also plays a vital role in effective communication with clients, customers, and employees. One of the most popular and reliable platforms for business email registration is Google. In this ultimate guide, we will walk you through the step-by-step process of how to register your business email with Google.
Step 1: Choose a Domain Name
Before you begin the registration process, it’s important to have a domain name for your business email address. A domain name is the web address that people will use to access your website and email. Choose a domain name that represents your business and is easy to remember. If you already have a domain name, you can skip this step.
Step 2: Choose a G Suite Subscription
Google offers a suite of productivity tools for businesses called G Suite. It includes Gmail for business, Google Drive, Google Calendar, and more. To register your business email with Google, you will need to choose a G Suite subscription that suits your needs. There are various pricing options available, depending on the number of users and storage requirements.
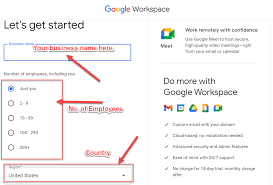
Step 3: Sign Up for G Suite
Once you have selected a G Suite subscription, go to the G Suite website (gsuite.google.com) and click on the “Get Started” button. You will be prompted to enter your domain name. If you already have a domain name, enter it in the provided field. If you don’t have one, you can register a new domain name through Google Domains.
Step 4: Verify Domain Ownership
To ensure that you have the authority to set up a business email with Google for your domain, you need to verify your domain ownership. Google provides several options for verification, including adding a TXT or CNAME record to your domain’s DNS settings or uploading an HTML file to your website’s root directory. Follow the provided instructions to complete the verification process.

Step 5: Set Up Email Accounts
Once your domain ownership is verified, you can start setting up email accounts for your business. In the G Suite admin console, go to the “Users” section and click on “Add new user.” Enter the required information, such as name, email address, and password for each user. You can customize the email address format according to your preferences (e.g., [email protected] or [email protected]).
Step 6: Configure Email Settings
After creating email accounts, it’s time to configure your email settings. In the G Suite admin console, navigate to the “Settings” section and click on “Email.” Here you can customize settings such as email signatures, forwarding, filters, and spam controls. Take the time to explore and set up these settings according to your business requirements.
Step 7: Access Your Business Email
With your business email registered with Google, you can now access it through the Gmail interface. Users can log in to their business email accounts by visiting Gmail’s website (mail.google.com) or using a third-party email client (e.g., Microsoft Outlook, Apple Mail, etc.) using their business email credentials. The email interface is user-friendly and offers a range of features to enhance productivity and organization.
Step 8: Integrate G Suite with Other Apps
Google’s G Suite can seamlessly integrate with various other apps and platforms that your business may already be using. You can easily connect your business email with third-party tools such as CRM software, project management tools, and customer support platforms. Explore the G Suite Marketplace to find apps that suit your business needs.
Step 9: Train Your Employees
Once your business email is up and running, it’s important to train your employees on how to use it effectively. Provide them with a basic understanding of Gmail’s features, email etiquettes, and security practices. Encourage them to utilize the collaboration tools within G Suite for improved productivity and communication.
Step 10: Secure Your Business Email
Lastly, prioritize the security of your business email by enabling additional security features offered by G Suite. This includes two-factor authentication, which provides an extra layer of protection against unauthorized access. Regularly update passwords and educate your employees about phishing scams and email security best practices.
A Step-by-Step Guide on How to Create a Company Email Using Gmail
Registering your business email with Google is a straightforward process that can have a significant impact on your professional communication and brand image. By following this ultimate guide, you can easily establish a professional email address for your business, streamline your communication processes, and enhance productivity within your organization. Take advantage of Google’s powerful G Suite and enjoy the benefits of a professional business email.
[ad_2]